Drum Accents: How to Create Dynamics and Groove
Drumming is not only about playing the right notes at the right time. It is also about how strongly or softly you play each note. This is where drum accents become important.
An accent makes one note stand out from the notes around it. When you use accents together with normal notes and soft ghost notes, your playing becomes more musical, expressive, and interesting.
In this guide, you'll learn:
- What a drum accent is
- How accents are written in drum notation
- How to play an accented note
- The difference between accents, normal notes, ghost notes, and rests
- How to practice accent patterns
- How to use accents on the snare and hi-hat
- How accents can change the feel of a groove
- How to practice accents with the drum sequencer
What Is a Drum Accent?
A drum accent is a note that you play louder or with more emphasis than the notes around it.
Think about someone speaking:
"I really want to go."
The word really might receive extra emphasis. In drumming, an accent does something similar. It makes a particular note stand out.
For example, imagine playing eight notes with your right and left hands:
If every note has roughly the same volume, the pattern sounds flat.
Now accent some of the notes:
The accented notes create peaks in the rhythm.
This difference between louder and softer notes is called dynamics. Dynamics are one of the main things that make a drum groove feel alive rather than mechanical.
How Is an Accent Marked in Drum Notation?
The most common accent symbol is:
It is normally placed above or below the note it affects. For example:
The > tells you: play this note with more emphasis than the surrounding notes.
The accent does not normally change the rhythm or the note value. It changes how the note is played. So if you see a quarter note with an accent, you still play a quarter note. If you see an eighth note with an accent, you still play an eighth note. The accent tells you to bring that particular note forward dynamically.
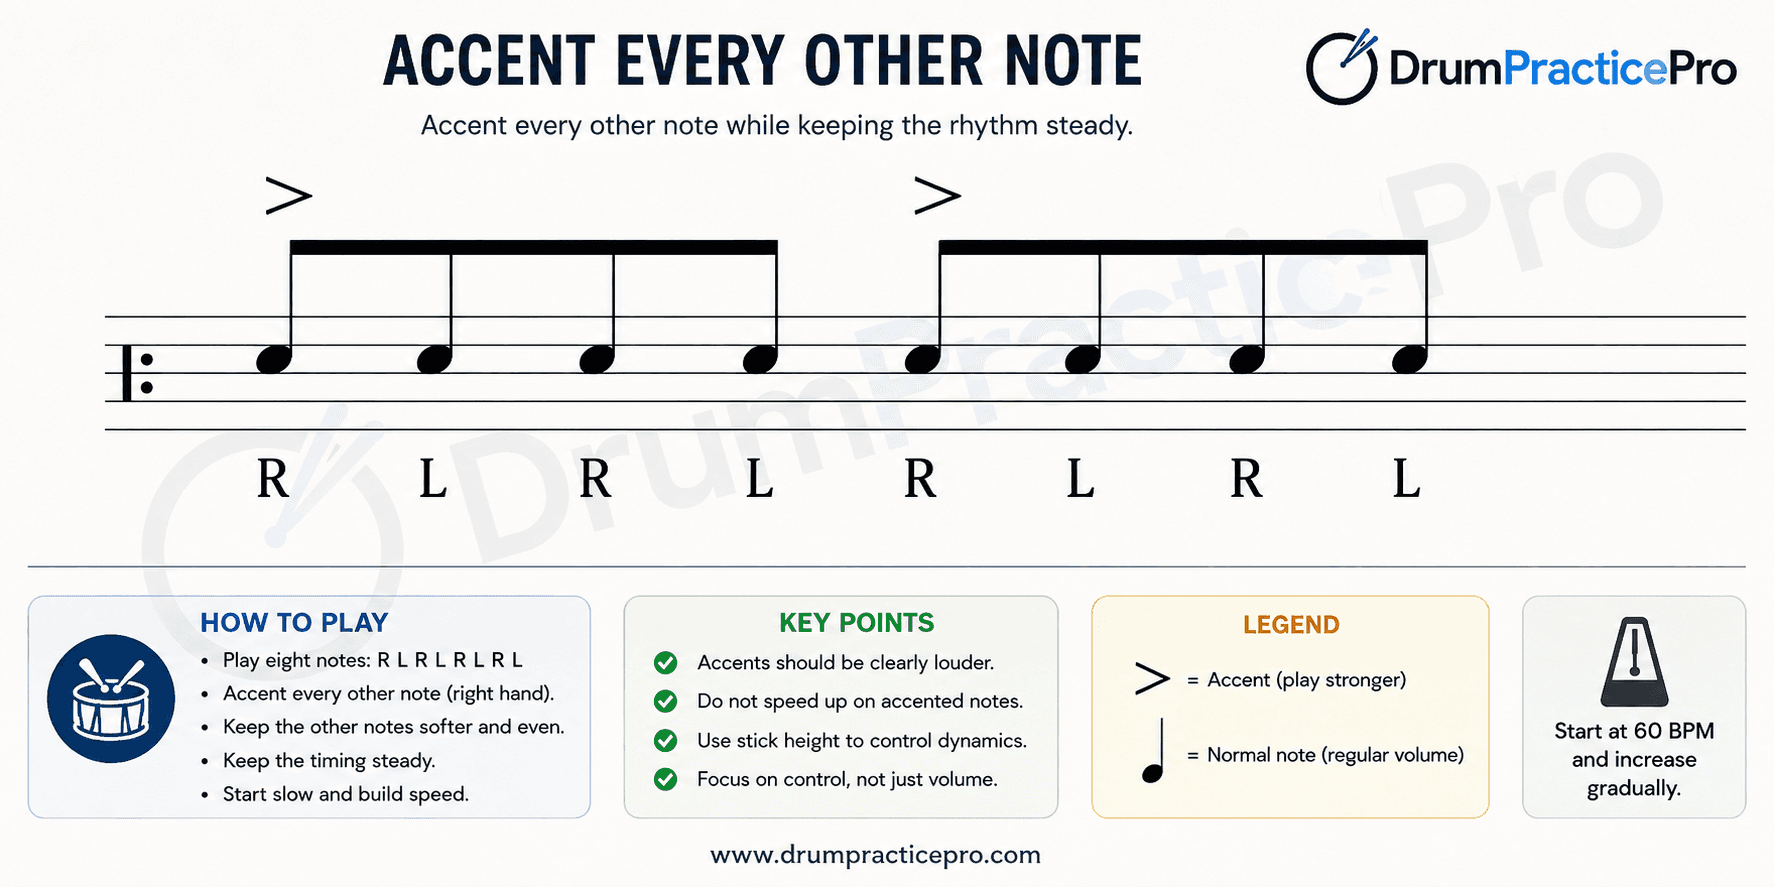
The > symbol in practice: an accented eighth-note pattern with R/L sticking, ready to play at 60 BPM.
Accent vs. Normal Note vs. Ghost Note vs. Rest
Understanding these four ideas is very important for learning drum dynamics.
1. Normal note
A normal note is played at the regular dynamic level of the pattern. For example:
If there are no dynamic markings, you normally play the notes at a comfortable, even volume.
2. Accented note
An accented note is stronger than the surrounding notes. Notation:
You can think of the dynamic levels like this:
The accent should be easy to hear, but it should still fit naturally into the groove.
3. Ghost note
A ghost note is the opposite idea. Instead of making the note stronger, you play it very softly.
Ghost notes are especially common on the snare drum in funk, R&B, pop, and other groove-based styles. They are often written with the notehead inside parentheses. For example:
The exact notation can vary between drum charts, but parentheses around a notehead are a common way to indicate a ghost note. A useful way to think about it is:
This creates three different dynamic levels.
4. Rest
A rest means do not play a note, but the time still exists. For example:
The rest is not a very quiet note. It is silence. This is an important difference:
- Accent: play the note strongly
- Normal note: play the note normally
- Ghost note: play the note very softly
- Rest: do not play the note
Learning to control all four gives you much more control over a groove.
A Simple Dynamic Scale for Drummers
You can imagine your playing as a simple volume scale:
For example:
This gives you four different levels of activity.
You do not need to think about exact decibel levels. Instead, focus on the difference between the notes. The important thing is contrast.
If your normal notes are already very loud, it becomes difficult to make an accent stand out. If your ghost notes are too loud, they stop sounding like ghost notes.
How Do You Play an Accent?
The easiest way to learn accents is to start slowly.
Set your metronome to around 60–70 BPM. Play alternating single strokes:
First, make every note the same volume. Then accent every other note:
The important part is not simply hitting the accented notes harder. You want to create a clear difference between:
without changing the timing.
Keep the Rhythm Steady
This is one of the biggest challenges when learning accents. Many beginners accidentally speed up when playing an accent. For example:
becomes:
with the accented notes arriving too early. Don't let the accent change the timing. Try counting:
Then place your accents exactly where they belong. Your hands should change volume, not tempo.
Use Stick Height to Control Accents
One simple way to create dynamic differences is to use different stick heights.
For a normal or soft note, keep the stick relatively close to the drum. For an accent, allow the stick to travel higher before the stroke. For example:
You don't need a huge motion. The goal is controlled movement.
A common mistake is trying to create accents only by squeezing the stick harder. Instead, learn to control:
- Stick height
- Wrist movement
- Rebound
- Touch
- Volume
Good accents should feel controlled, not forced.
Exercise 1: Accent Every Other Note
This is one of the easiest places to start. Play continuous eighth notes:
Accent the right hand:
Start at 60 BPM. Play for one or two minutes. Your goal is to make the accents clearly louder while keeping the other notes even and relaxed.
When this feels easy
Increase the tempo gradually:
Do not increase the BPM until you can keep the accents controlled.
Exercise 2: Move the Accent
Now keep playing the same eight notes, but move the accent.
This exercise teaches your hands that an accent can happen anywhere. Do not allow the accented note to change the timing of the other notes. This is a simple exercise, but it builds an important skill for real grooves.
Exercise 3: Accent Patterns with 16th Notes
Now move to sixteenth notes. Count:
Play:
Then add accents. For example:
This creates a changing rhythmic shape. You can move the accents to different sixteenth-note positions and create hundreds of different patterns. Accent exercises like these are useful because they force you to separate rhythm from dynamic control.
Exercise 4: Accent + Ghost Notes
Now we can combine the two opposite ideas: accents and ghost notes. Imagine a snare pattern like this:
The accented notes are strong. The ghost notes are very soft. This creates a much wider dynamic range:
This is one of the foundations of many funky and expressive drum grooves.
When practicing, don't worry about making the ghost notes completely disappear. At first, make them soft enough that the accented notes clearly dominate. As your control improves, make the ghost notes quieter. Ghost notes are commonly used to fill the space between stronger notes and give grooves more texture and movement.
Using Accents on the Snare Drum
The snare is one of the easiest places to hear dynamic changes. Start with a simple backbeat:
In a typical rock groove, the snare often emphasizes beats 2 and 4. Now add softer notes around those backbeats. For example:
The main snare hits on 2 and 4 can be accented, while additional snare notes between them can be played softly. This gives you the classic idea of:
It is a simple concept, but it can make a groove sound much more musical.
Using Accents on the Hi-Hat
Accents are not only for the snare. You can also accent selected hi-hat notes. Start with eighth notes:
Play the hi-hat evenly. Then accent the "&" counts:
This can make the groove feel more energetic and can help create a lift in the rhythm. You can also experiment with different accent locations. For example:
or:
Small changes like these can create very different feels.
Accents in a Complete Drum Groove
Now let's put everything together. Imagine a basic rock groove:
- Hi-hat: eighth notes
- Kick: beats 1 and 3
- Snare: beats 2 and 4
The basic groove may sound good, but the dynamics can make it feel much better. You could:
- Accent the snare on 2 and 4
- Keep the main hi-hat notes at a medium volume
- Add selected hi-hat accents
- Add quiet snare ghost notes
- Keep the kick consistent
Now you have different dynamic layers. This is where accents become much more than a notation symbol. They become part of your groove vocabulary.
Why Accents Make Grooves Sound Better
A groove where every note has exactly the same volume can sound mechanical. Accents create movement.
Think about a drum groove as a conversation.
Some notes speak loudly.
Some notes speak normally.
And sometimes there is silence.
That combination creates dynamics, feel, and groove. Two drummers can play exactly the same written rhythm but sound completely different because their dynamic control is different.
That is why learning accents is not only a technique exercise. It is also a musical skill.
Common Accent Mistakes
Mistake 1: Hitting too hard
An accent should stand out, but you don't need to destroy the drumhead. Try to make the accent strong through controlled movement rather than excessive force.
Mistake 2: Making every note loud
If everything is loud, nothing sounds accented. You need quieter notes around the accent to create contrast.
Mistake 3: Changing the tempo
If you hit an accent and suddenly speed up, the exercise is not doing its job. Practice with a metronome and concentrate on keeping every subdivision in the same place.
Mistake 4: Making ghost notes too loud
Ghost notes should sit underneath the main notes. If you can hear every ghost note as strongly as the backbeat, the dynamic difference is probably too small.
Mistake 5: Practicing too fast
Accents are about control. Start slowly. A clean accent pattern at 60 BPM is more useful than a messy accent pattern at 140 BPM.
How to Practice Drum Accents with the Sequencer
The drum sequencer makes it easy to turn these exercises into actual practice routines.
Step 1: Create or load a rhythm
Start with a blank bar or load a groove from the groove library. Choose a simple rhythm first. If you are a beginner, start with eighth notes. If you are more comfortable, try sixteenth-note patterns.
Step 2: Add your accents
Mark the notes you want to emphasize. Try different accent positions and listen to how the groove changes.
Step 3: Add sticking
Use R/L sticking to see which hand plays each note. For example:
This is especially useful when you start moving accents between your right and left hands.
Step 4: Start slowly
Set the tempo to something comfortable, such as 60 BPM. Loop the pattern. Focus on making the accents clear while keeping every other note controlled.
Step 5: Increase the tempo
Once the pattern feels comfortable, increase the BPM gradually. For example:
If your accents become messy, drop the tempo again.
Step 6: Experiment
Don't practice only one accent pattern. Move the accents around. Try:
- Every second note
- Every third note
- Every fourth note
- Offbeat accents
- Sixteenth-note accents
- Snare accents
- Hi-hat accents
- Accent + ghost-note combinations
This turns one simple rhythm into many different exercises.
A 10-Minute Drum Accent Practice Routine
You don't need an hour to work on accents. Try this simple routine.
Minutes 1–2: Even strokes
Play:
Focus on relaxed, even strokes.
Minutes 3–4: Basic accents
Accent every other note. Focus on the difference between loud and soft.
Minutes 5–6: Moving accents
Move the accent to different positions. Keep the tempo steady.
Minutes 7–8: Sixteenth-note accents
Play sixteenth notes and experiment with different accent patterns.
Minutes 9–10: Groove application
Create a simple drum groove and add accents. Listen to how the groove changes.
The final goal is not simply to play an exercise correctly. The goal is to take the dynamic control from the exercise and use it in real music.
Beginner Challenge
If you're just starting with accents, try this:
Play four bars with no accents. Then four bars with an accent on every right hand. Then four bars with an accent on every left hand. Then four bars with the accents moved randomly.
The challenge is to keep the rhythm exactly the same while changing only the dynamics.
Intermediate Challenge
If you already have good basic control, try this:
Play continuous sixteenth notes using:
Create a different accent pattern every two bars. Then add ghost notes around the accents. Finally, move the pattern onto the drum kit:
- Accents on snare
- Normal notes on hi-hat
- Ghost notes on snare
- Kick maintaining the groove
This is where accent exercises start becoming real musical vocabulary.
Final Tip: Think About Contrast
The secret to good accents is not simply playing louder. It is creating contrast. Think:
The bigger the useful contrast, the easier it is for the listener to feel the rhythm.
Start slowly, use a metronome, and focus on control before speed. Once you can control your accents, you can make simple drum patterns sound much more expressive and musical.
Ready to Practice?
Open the sequencer and create your own accent exercises. Start with a simple rhythm, add accents, choose your sticking, set a comfortable BPM, and loop the pattern. Then move the accents around and see how much one small change can transform the groove.
Practice the rhythm. Control the dynamics. Build your groove.
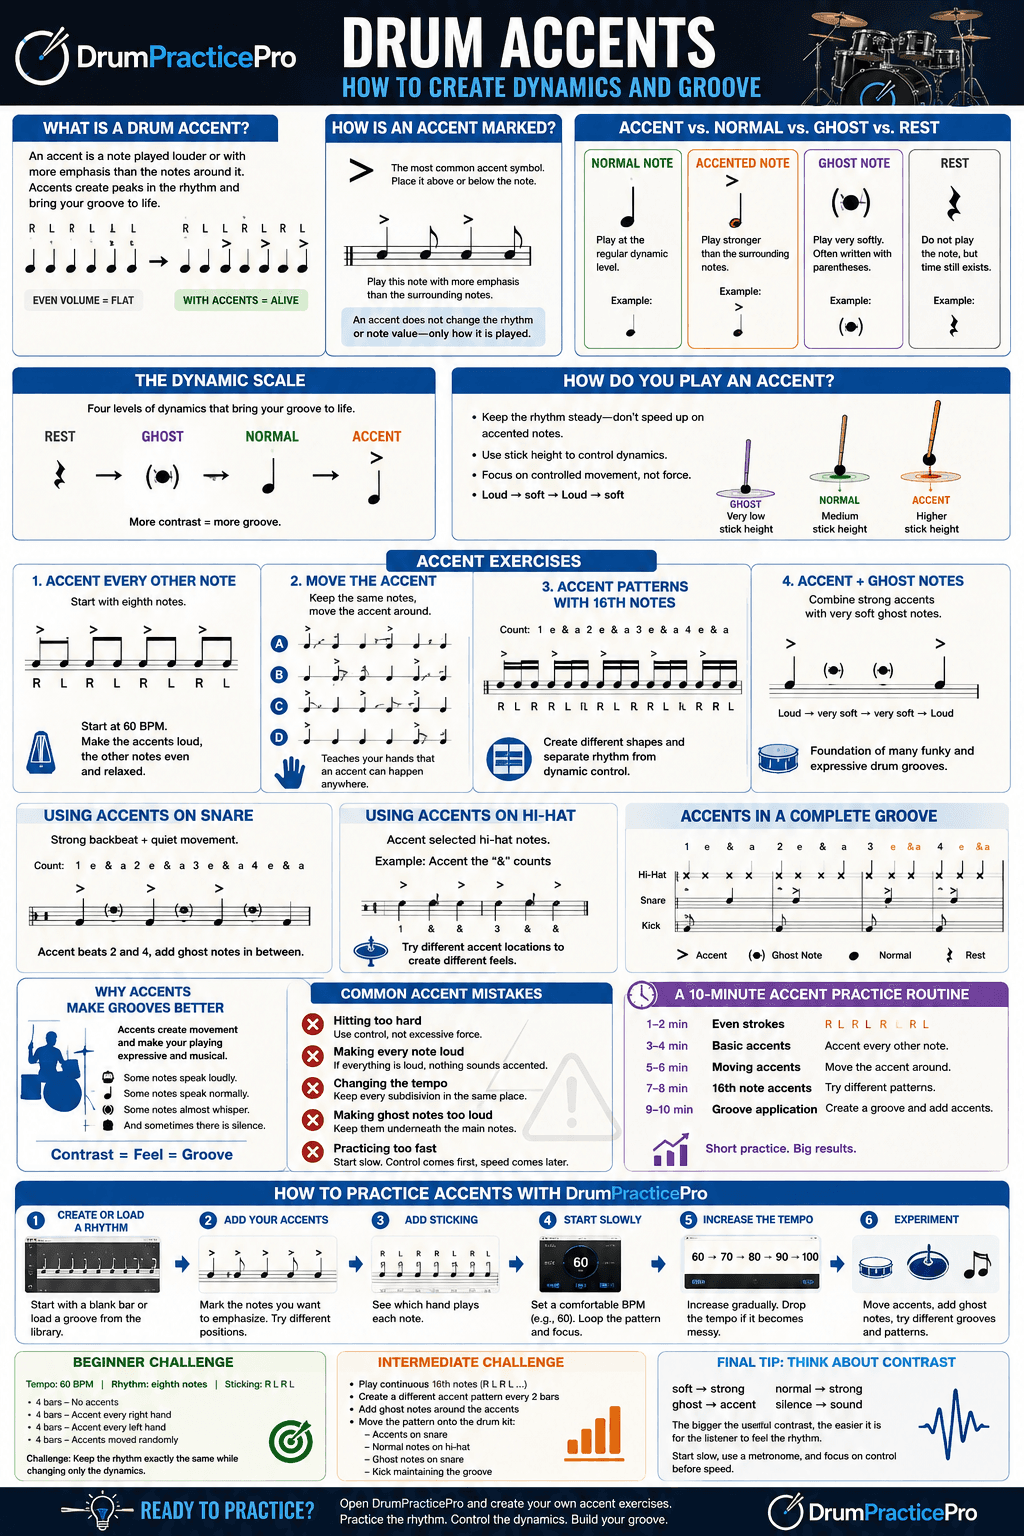
A quick-reference cheat sheet for everything in this guide — notation, the dynamic scale, the four exercises, and the 10-minute practice routine, all on one page.
← Back to guide